Word of the Day!

Word of the Day

Friday, December 28, 2007

First Serger Project


Christmas day, I was too tired to even think about messing with my serger, knowing that it was going to require intensive concentration and use of the manual. So I put it off, and didn't actually mess with the thinkg until Wednesday night. And I wasn't very sucessful then, either, but Brandon figured out the problem, and so yesterday, I was rarin' to go and MAKE SOMETHING with it. (You will have to excuse my photo. My lovely assistant is driving the truck today and so wasn't handy to take pictures)

A month or so ago I bought a size medium men's long sleeved polo shirt at a thrift store with the intention of cutting it up to use the fabric for a long-sleeved tee from the New Look 6160 pattern, with some adjustments, since I didn't like the fit of the first one. I hadn't gotten around to it, though, and figured it was a nice, low-risk first project for the serger, since it was a simple pattern and I wouldn't cry if I messed up the fabric. It's a strange houndstoothy sort of plaid, which I like, yet think is ugly. Kind of like troll dolls. Anyway, there are some challenges inherent in cutting out a pattern from fabric that you have an extremely limited amount of, which is why the sleeves are 3/4 length. I guess I should have bought a size large or extra-large. It is also why the neckband is black fleece leftover from Brandon's shirt jacket. But I actually like the effect.

The changes I made besides sleeve length were to add about an inch to the circumference of the garment, since the original was too narrow for me in the shoulders. Then I changed the neckline and made it lower and wider since the first one I made barely fits over my head. Because I wasn't sure what length to make the neckband for the new neckline, first I made one too short, and then one too long, which I didn't realize until after it was applied, and that's why the neckline has a slight cowl effect.

I serged all the major seams, and only used the sewing machine to top stitch the neckline and hem and baste in the sleeves (Another pitfall of creating from existing garments with no extra fabric, I cut two left sleeves out, and there was no fabric left to fix the mistake. Luckily, you can barely tell. The right and left sleeve of the pattern aren't that different.)

Overall I think it went pretty well, although I think this shirt will mostly be worn around the house. I like the looser fit, since I added about an inch to the circumference, and the serger makes narrower seam allowances, so that added a little room, as well.

Wednesday, December 26, 2007

Does a chocolate covered cherry count as a serving of fruit?


Christmas is over, and it went very well for us. Brandon and i made a quick trip to Texline and celebrated Christmas on Christmas eve at my parents' house, with my brother and my sister and her husband. The insulated shirt jacket went over well, and my mom liked the Christmas table runner I made for her (pic at left). I'm so excited to finally get to post pictures of all the things I've been working on for the last month or so.

Christmas morning we had Brandon's parents, maternal grandparents, and his brother and sister over for brunch. His mom brought muffins, his grandmother brought spiced cider, and I made a breakfast casserole, fruit and yogurt parfaits, and pecan praline biscuits.

I got a serger! I've been wanting one for quite awhile. I will also have to be buying a new sewing machine sometime soon, since my old Kenmore barely made it though the Christmas projects. The stitch length randomly varies itself, and the tension is wacky.

Brandon loves the shirt jacket I made for him. Thanks to it being the second one, I think it turned out better. I had Brandon try Ty's on several times to assess fit and such, so I tweaked it a bit to suit Brandon, putting in side seam pockets (he thought Ty's should have had them, and the first thing Ty did when he put it on was stick his hands where the pockets would have been) and putting a drawstring on the hood (there are two views for the pattern, one with a collar, one with hood. Brandon got the hooded version, since he likes to have his ears covered.). Of course there was the inevitable "monkey arms" alteration. I am planning a post to detail these changes.

Brandon's grandmothers both liked the potholders I made for them. As you can see, the teacup pattern abounded this Christmas. I really like it, which isn't surprising since I collect teacups. I am toying with the idea of making a teacup quilt for myself, although it is a very big project, and would have to be some time down the road.

Wednesday, December 12, 2007

Is Wal-Mart Cheaper than Sewing Your Own? (Ty, Don't Read This)

I figure there is about a .0001 % chance that my little brother reads my blog about sewing, so it is safe to post his Christmas present. But if I am wrong, Tyrel, don't read this! Or I will give it to Brandon, and you will get a lump of coal.

I have heard lots of women say that they don't sew (anymore) because it's just cheaper to buy clothes at Wal-Mart. Is it?

I'd say yes and no. Sometimes, if you get fabric and patterns on sale or at a thrift store, it's cheaper to sew your own. I've made dresses that cost $2. I bought four yards of fabric at a thrift store for fifty cents, and if you use vintage patterns found at a thrift store, patterns can be 10 cents apiece, as opposed to the $8 or so that they cost new and not on sale.

But sometimes you can't find these wonderful deals, or you are making something like the shirt jacket that I made my brother for Christmas. Which, being lined, required somewhere along the lines of six yards of fabric. Which I did buy on sale. I bought the pattern, which is out of print, off of E-bay, so it cost a more than ten cents. All in all, I'd say materials cost around $20. The cost of the pattern can be spread out among the many projects I hope to make from it. While I was slaving over this shirt jacket (and believe me, I got to be good friends with my seam ripper) I saw that similar items (insulated flannel shirt jackets) cost around $15 at Wal-Mart.

The thing about Wal-Mart, though, is that the quality of the clothing is low. My husband has one of those cheap shirt jackets, and it falls apart a little more each time it is washed. And the cloth that I made Ty's shirt out of is moleskin, not the flannel that they make the shirts at Wal-Mart out of. And moleskin shirts cost a bit more than $15. Also, gray and black is a color combination that I believe Ty is fond of. I just did a google search for men's moleskin shirt jackets, and they all cost more than I spent on materials (from $25 for an unlined one, to $90 and considerably higher), and only one came in that color combination. Oh yeah, and Ty has monkey arms, so off the rack shirts in "his size" don't usually have long enough sleeves to suit him.

So sometimes, what you have to take into consideration is not, "Is it cheaper than Wal-Mart?" but "Is it cheaper than items OF SIMILAR QUALITY and the same material?" and "Can I find it in the colors/size/style that I want?"

Okay, stepping off the soap box now.

Wednesday, December 5, 2007

Warm Winter Coats


Being warm in the winter is something that I think a lot of people take for granted. There are a lot of people who have a hard time achieving that, though, partly because winter coats can be very expensive. If you know of a coat drive in your area, I encourage you to contribute to it. Go through your closets for gently used coats.

I volunteer once or twice a week at a clothing pantry (Is that the right word? Like a food pantry gives away food, we give away clothes) and we are always in need of children's coats (at least this time of year). There are a lot of thin jackets, but few heavy coats. Also men's coats. I assume this is because men buy fewer coats and wear them out before getting new ones.

If you don't have any gently used coats, it's a great idea to check out the Salvation Army or other thrift stores and buy some to donate. I've found a nice kid's parka for $1 once, and today I bought several coats for around $4 apiece.

Tuesday, December 4, 2007

Christmas Inspirations!


Glory Gifts, a shop on Etsy, has some really cute Christmas things in her shop. My favorites are these mini stockings, which come in several colors. Obviously they are handmade with lots of love!

Friday, November 30, 2007

Tip Day


On one of the blogs I regularly visit, The Happiness Project, "Every Wednesday is Tip Day". Well, it's not Wednesday, and I don't know if I'll make this a regular feature, but here is a tip I have found useful. I thought it up myself, although I'm sure others have come up with this too.

I hate trying to get patterns back into the pattern envelopes. They never go back right, and if you have to get them out later during the sewing process for reference (because oh, say, you forgot to mark some vital little dot or accidentally ripped your thread marker out thinking it was a stray piece of thread, not that I would ever do that, of course) it's a big pain, especially if it is one of those patterns that has six or seven different views and a host of little pieces to sort through.

So what I've started doing is putting the pieces for the particular view I'm working on into a ziploc bag, and labeling it with the pattern number and some personal identifier that will help me know which pattern it is (Brandon's shirt, for example). Especially on patterns that I plan to use often or have modified in some way, this simplifies my life and prevents frustration.

Thursday, November 29, 2007

The Christmas Spirit

I am definitely in the Christmas spirit now, which is a good thing, because I'm making a lot of my presents, and I was just terribly unmotivated for awhile. I haven't got my tree up, but that should happen pretty soon.

I can't show one of the things I made, because it is a gift and I don't want to spoil anyone's Christmas, but I finished this apron using some of the Christmas fabric I bought, and I think it is adorable. The pattern is this one that I got at Hobby Lobby in a 99 cents sale. Yay! It's very simple to make (especially since I omitted the piping that is called for). The ties are made from double-fold bias tape.

Not sure whether I will keep this or use it in a gift exchange. I think I have enough fabric to make another one, but would have to buy more bias tape.

I'm looking forward to trying out some of the other apron patterns, too.

During my absence...


Last week was a busy week. We did a lot of driving. See, Brandon and I finally got to go to Ruidoso and Carlsbad Caverns, as we've been planning to for a couple of months now. Finally all the farm work was out of the way.

Then we had Thanksgiving at his grandparents, and the day after Thanksgiving we went to Texline for a meal with my family (my grandmother and aunt on my dad's side, my parents, and my brother and sister). I ate enough turkey and ham to last me for a month or two. The big news of the week was that my sister, who is expecting, had the sonogram to determine the sex of the baby, and it will be a little boy. So expect little overalls and things in the near future. We are all very excited. It will be the first grandchild for my parents, and my first nephew.

Saturday, November 17, 2007

Shiny Object!


This is probably my favorite thing that I've bought off of Etsy. It's from Keys and Memories, and is made from a vintage typewriter key.

Being a writer, I like that it is made from a piece of vintage writing equipment. And it goes well with tee-shirt and jeans, so I actually get to wear it.

Friday, November 16, 2007

The Hat


Here is the completed hat, which I gave to my husband yesterday. I was up late the night before finishing it, and in a hurry. I didn't want to look up pattern with the decrease rows that I usually do, so I winged it, and it turned out kind of funny-looking. But it is warm, and Brandon doesn't mind, so I will leave it as is.

Thursday, November 15, 2007

Things I wish pattern companies still did...


Sometimes sewing with vintage patterns is easier to me than sewing with modern patterns. For one, most of them come one size to an envelope, which makes cutting them out a lot simpler process (so you don't accidentally cut on the wrong size line), and eliminates my worries that I might get fat and need the pattern in a larger size, so maybe I should try to preserve the larger sizes somehow so I can use them later. The only foolproof way to do this is to trace all of the pattern pieces onto tissue paper, which is a lot of trouble to go through, and so I usually don't do it, and then I feel guilty because I am throwing all those sizes away.

Also, I wish pattern companies still included a miniature picture on the back of the envelope showing all of the pattern pieces, or at least mentioned how many pattern pieces were in the pattern, so that I don't open it up and start looking at the instructions, and freak out because there are about 19 little fussy pieces. At least I could be prepared. Maybe they are afraid that someone will look at little pattern piece pictures and figure out how to draft their own without buying the pattern, but people that highly motivated not to spend money on a pattern are probably not going to buy your pattern anyway.

But what I really, truly wish most of all was that pattern companies still sold their patterns for fifty cents.

Saturday, November 10, 2007

Secret Agent Hat


The hat is coming along, but perhaps not as fast as it needs to...I just realized I have five days, and two or three of them we'll be travelling. I better get cracking.

Today I have dedicated to brainstorming for titles for my novel. For some reason, this is coming really hard for me on this one. Nothing sounds right, I don't even have a working title. Yesterday I hit 175 pages (61,130 words), woo hoo! I think it isn't going to wrap up as quickly as I previously thought, though.

Friday, November 9, 2007

Sewing with Knits, Part 3 - Trials, Tribulations, and Triumph

I sewed the sleeve seams and hemmed them, no problems. Then I went to put the sleeves on, and in the instructions, either they don't expect that you will need to sew gathering stitches across the top of the sleeve cap, or they just left that part out. So I tried it without gathering stitches, and just stretched the knit to fit. It worked okay, but the sleeves are a little funky. I'm not sure if it was sewing them up that way, or the fact that the material is not cut on the grain.

When I went to try the shirt on, the neck hole is very small. I can barely get it over my head.

As I was sewing the hem, over halfway through with it, I ran over one of the pins. I've done this before, and bent pins and broke needles, but never quite so spectacularly. The pin was jammed way down in the plate of the machine. When I pulled it out, it left a big hole in the fabric. Well, big is a relative term. I could probably fit my pinky through it. I put a little patch over it and called it good, though. If it had been on a project that had gone perfectly up until that point, I would have been more upset, but this shirt has so many other issues that it is low on my scale of concern.

Basically, as the shirt turned out, I will wear it, but if I am going to make the pattern again there will have to be some major changes. For one, the neck hole is too small and needs enlarged. For two, although I cut the pattern to my size given my measurements according to the chart on the back, the shoulders are about a half inch too narrow on each side, making the shirt pull and stretch oddly around the shoulders and neck. And people, my shoulders are not that broad. This is not a normal problem for me. I have had fit issues with New Look patterns in the past, only in the other direction - the pattern was way too huge for me, even on the smallest size.

I like the idea of making my own tee shirts. Tee shirts are truly a wardrobe staple for me, and I love this sort of long sleeved close fitting tee in the winter for layering. So I'm disappointed that this pattern will take so much tweaking to work (since I cut on the smallest size and can't now cut out the next size up, which might fit better). I know, I could just go out and buy a pattern from a more reliable pattern company, and eventually I might, but I will probably first try to tweak this one to work, since I'm (A) cheap and (B) get a perverse enjoyment out of making patterns work that originally did not work for me.

In case anyone is wondering, I am going along quite well with my writing, keeping up my daily page counts. :)

Sewing With Knits, Part 2


The second day of progress on this shirt (which was actually two days ago because I am lazy about blogging these things) went fairly smoothly, thanks in part to my dear husband, who oiled my sewing machine and tinkered with it so that it ran a lot smoother than before. I don't have a real "knit stitch" on my machine, so I used a narrow zig-zag and then trimmed the seam to 1/4" and overcast the raw edges together. I like the nice finished seams it made. I really want a serger for Christmas, though. Does anyone have serger recommendations?

Thursday, November 8, 2007

The Shirt - Cutting Out


I started on a long sleeve tee from the teacup fabric. When I prewashed the fabric I found out why it was $1 a yard. The washing and drying made obvious the fact that the printed teacups are not on the grain. It was such a pain to cut out, since I wanted the teacup "stripes" to look sort of straight. I pinned the fabric to the carpet and laid the pieces out all weird and slanted. I couldn't for the life of me get the stripes to go evenly across a fold for the front piece, which is supposed to be cut on the fold, so I had to make a second half out of leftover tissue paper and cobble the halves together.

The pattern is a New Look pattern I've had for three or four years. My mom bought it for me while I was in Ecuador and I had just bought a sewing machine. They don't have patterns in Ecuador. All of the women who sew clothing have learned pattern drafting, which is commonly taught in what we would call vocational high schools. I didn't use the pattern, though, because I didn't want to sew with knits. Instead, I carried it back home with me after Peace Corps and it sat in a drawer. I tried to sell it on Ebay (with two other patterns) and got no takers. But finally it is coming in handy. I did lengthen the torso of the shirt by two inches, as I am not fond of lifting my arms and having my tummy on display.

It took forever, and made me really really wish I had gotten some NORMAL fabric for my first try at sewing with knits. I think this pattern would have been a snap to cut out, otherwise. Not a lot of pieces, and not a lot of notches and circles to mark. The print still turned out a little wonky, not straight across all the pieces as I had hoped. But I think it will all work out now. It's just a sort of wearable muslin, an experiment, anyway, to see how I like both the pattern and sewing with knits in general.

The best tip for cutting out knits that I got out of my Vogue Sewing book was to pin the pieces to the wrong side of the fabric and cut them out. That way they curl less. And it's true. I cut the neck piece out on the right side, and it curled like crazy. I'm not sure why that is, exactly.

Tuesday, November 6, 2007

Secret Super Power

My husband and I watch a lot of old movies (we just subscribed to Netflix, and it has definitely enabled this behavior). I used to watch old movies, and not really notice the clothing much, unless it was really out there, but since I've gotten into vintage fashion (since maybe a year or two ago now) I've found I can place a movie by decade based on the clothes the women are wearing. I guess it doesn't sound that impressive, but the last 3 movies we watched, my husband and I would have discussions that go basically like this:

Me: When was this movie made?
Him: Oh, it's from the 60's, I think (or 70's, or 80's or whatever the case may be)
Me: No, it can't be. It looks like it's from the 50's to me. (or 60's or whatever)
Him: No, I don't think it's that old.
Me: That dress is classic 50's.
Him: (picks up the DVD jacket and looks at it) Huh. 1954.

It's not really a useful skill, actually. And I swear I don't do it to look like a know-it-all, although as I write that conversation out, it seems like it. It's just that Brandon isn't really tuned into the fashion details that date a movie for me. I also spend an inordinate amount of time during movies trying to figure out if I've seen patterns similar to the dresses I like, and if I haven't, how I could recreate certain collar details (and it usually is collar details I'm fixating on, for some reason). Even in the Wizard of Oz I do that, and I had watched it probably a hundred times before without really caring about the specific details of Dorthy's dress. (Oh, and there is a costume pattern for it put out by McCalls or someone, but the blouse is considerably simpler than the blouse Dorthy is actually wearing in the movie.)

We watched The Rear Window last night. It's a fifties movie with Jimmy Stewart and Grace Kelly, directed by Alfred Hitchcock. I'm sure I'm not saying anything groundbreaking when I say Hitchcock really knew his stuff when it came to creating suspense. And he didn't have to resort to a lot of pyrotechnics and ridiculous plot twists to do it. Although I do question the intelligence of the main character in the final confrontation scene. You're telling me in that whole apartment, the best weapon he could come up with is his camera?
I went fabric shopping yesterday. I was supposed to be shopping for some fabric for Christmas gifts, but what I bought was for me. There was a big fat bolt of the stuff for $1 a yard at Wal-Mart, and I've been thinking I want to try sewing with a knit, and it's been sitting there all alone for awhile, calling to me, and nobody wants it, and it has teacups, for goodness sake. I couldn't help myself. I think I'll make a simple long-sleeve tee to start with.

I have a strange attraction to certain odd fabrics. Like there is a flannel at that same Wal-Mart, blue and white checked like a tablecloth, with ants printed on it. And if it were anything but flannel, I'd already have bought it, and made a nice circular skirt for wearing on picnics in the summer (this is what I tell myself I would wear it for, anyway). But a nice circular skirt in flannel is going to be way to hot for summer, and the print is not a winter print at all. So I haven't bought it.

Saturday, November 3, 2007

Eek!

I didn't realize it had been so long since I blogged. And it's not like I've been overwhelmingly busy, I just let it slip. So easy to do.

This is November, and I sort of wish I were doing NaNoWriMo. I thought about it, back a couple of months ago, when I thought that the novel I am working on would be done (at least, the 1st draft would be done) by now. But I stalled out on that novel-in-progress for a month and more, and I'm not going to start something new, or I'll never finish it. Instead, I am devoting November to finishing my novel-in-progress (which doesn't even have a working title). I'm on page 163. That is way longer than anything I've written before. I'm quite proud of myself, actually. I set myself a goal of two pages a day (except Sundays. I give myself Sundays off.)

Yesterday, I started a top-secret knitting project. Well, I'm going to post pics here, but my husband is under strict orders not to check this blog until after his birthday. I got out the knitting books (yup, that's pretty much my whole knitting library right there) and looked at patterns and tried some swatches, and cast on stitches for a hat. A black hat, how boring, but at least it isn't ALL going to be in k2, p2 rib, as many of my hats end up being. I tried the brioche stitch from Knitting Without Tears, and it didn't work out for me, so I'm going to use a variation of a pattern from the Vogue Stitchionary. You know, everyone raves about Knitting Without Tears, and its one of the big knitting classics, but I have barely used it. I just don't like the patterns much. I don't knit many sweaters, anyway. Actually, I've knit only one sweater, and have another in progress, delayed since last winter.

This is the first thing I've knit for Brandon. While we were dating, I thought about it, but I have experienced the Curse (albeit with a hat, and not a sweater) firsthand, so I didn't risk it.

The yarn is a Caron acrylic I've had leftover from a project my sophmore year of college (when I still crocheted, and hadn't learned to knit). It's very soft. I'm using a two strands held together, for warmth and so it knits up more quickly.

While I was looking at hat patterns online (I don't have a very large knitting library because so much can be found online) I found this blog, Kody May Knits. She knits A LOT of hats, and posts the patterns for free online (personal use only). If you're into funky hats (and some are very classic and pretty, as well) you might check it out.

Tuesday, October 30, 2007

Dressaday Special


Readers of the Dressaday blog can get a free dressmaking themed collage card when they buy a pattern from my shop and use the top secret coupon code (found in today's post on Dressaday). If you are not a reader of Dressaday, why not?! Go over there now, and read, for heaven's sake.

The coupon code goes in the "notes to seller" section at checkout.

Friday, October 26, 2007

Technically, Not an Apron: LoriK's Potholders


Potholders are not aprons, but they're in the kitchen and made out of cloth, which is close enough for me (By that token I guess tablecloths and napkins are close enough for me. And placemats, and toaster cozies.) I guess they seem related to me because my mom had a matching apron and potholder set that was given to her as a gift. And in 4-H, which was where I made my first apron, I also made a matching potholder out of the same material (mint green gingham, if you care). Potholders and aprons just go together.

Anyway, LoriK has some cool potholders. Not only hamburgers, but religious icons, baking pan conversion charts, and sugar skulls. Lori told me "I began making potholders because i knew that people don't bring huge amounts to the craft fairs. It was a way people could get practical mementos to take home with them. It is also a great way to use up some scraps! Scrap quilts are great, but they can get overwhelming."

And potholders make great gifts. Maybe I only say that because I give them a lot as gifts, but they are practical, and often overlooked when someone is stocking their new kitchen. My mom made a lot of denim potholders as gifts, too. It must be genetic.

And Now For Something Completely Different: Etsy Seller IHeartMies

This is another new Etsy seller, though she's made a good start. Some of my favorite items from her store have already sold. Stephanie was kind enough to answer some questions about her art for me.

You use a lot of interesting materials in your jewelry. Where do you get them?
the architectural people are left over from my schooling and have been screaming at me to use them for a few years. i have always wanted to make them into jewelry, clocks and dishware.
its like having a little friend with you all the time.
that is why i give them names and stories in the descriptions.
i have been finding and gathering keys for years not knowing quite what to do with them.
and i like wood, so the wood pieces i have collected and gathered from other etsians

What things are important to you as you are making an item?
i really try to focus on simplicity and structure.
i find beauty in things that are simple and do not have a lot of pieces.
and i ask myself
is it functional?
does it make a noise?
will this start a conversation?
who will wear this?
is this an interesting use of material?

What are your influences or inspirations?
well my namesake iheartmies comes from my love of mies van der rohe
he was my greatest influence during my architectural education and still continues to be.
and i really like wood
in a strange way that influences me quite a bit
as i strive to make nice simple modern things with wood

How has your life experience influenced your work?
my architectural background has definitely influenced my work as it gave me a sense of purpose.
that is when i learned importance of function and form.
it is also how i discovered my aesthetic.
and finally it helped me address my disdain for capital letters.

How did you discover Etsy?
from a design blog, i forget which one but it was a link to some cool wood jewelry.
then i just looked around at it for months.
then i started buying stuff
then i started making things
then i started selling things

Click the banner or the jewelry to visit her shop.

Thursday, October 25, 2007

Eye Candy for Apron Lovers


Here are some blogs that showcase aprons. All have met my stringent "ooh, pretty" requirements.

Tie One On

The Apronista

Apron a Day (and she posts pics from a lot of Etsy sellers, too!)

Frills, Frocks, and Fancies

Etsy Seller DianasDarnings' Aprons


This is my favorite apron from DianasDarnings. Not only is it blue and brown, which is my current favorite color combination, bu it has big pockets (I love pockets). I also like the clean lines and that her aprons aren't over-the-top frilly.

Diana told me "I'm inspired by my brothers. That sounds a little strange, but I have four of them, I'm the only girl. My mom is a HUGE tom boy. Growing up, I tried really hard to not be a tom boy and was in the kitchen helping a lot. It's important to me to embrace my femininity, so I try to feel pretty while cooking and in the kitchen. I think my aprons do the trick."

Click on the apron to visit Diana's shop.

(On a personal note: I am glad to see someone who doesn't confuse "feminine" and "frilly". Not that frilly things aren't feminine, but they aren't the whole definition of feminine, either.)

Wednesday, October 24, 2007

Etsy Seller Diamondmeenah's Aprons


These aprons on Etsy caught my eye. Not only does the seller make them from scraps, one of my favorite materials to work with, she sews them completely by hand, which boggles my mind. A couple are even made of recycled clothing.

I asked Julie Ann about her aprons, and she had this to say:
"I don't believe in things that can't be used for the purpose they were intended for. If all you can do with something is look pretty, to me it's pointless (with very few exceptions, since I've got a rather large collection of other wise pointless ceramic frogs). In the case of aprons, the reason most people wear them is to protect their clothing. With this in mind, my aprons are designed for people who craft with messy stuff as well as cooks who cook like me; I wear as much as I get into the pot or onto the plate.

The aprons are all made of scraps of fabric literally quilted together as you would a quilt for your bed. They are normally a bit irregular in their shape due to using scraps and a homemade pattern, but the are very durable. More often than not, you'll tear the fabric before you'll rip out my stitches. I use two pieces of thread when I sew instead of one like a sewing machine does. I also do what I believe is called a blanket stitch on the edges of the fabric to prevent it from fraying. I'm not sure of the stitch name because I taught myself to sew by looking at clothing seams and copying what I saw. I simply call the edging stitch a 'no fray stitch' because the fabric doesn't fray when I do it.

The aprons are designed as wearable art that you can take off and clean the counter or floor with if you need to. Any stains you acquire just add to the aprons charm, and they are designed that way. They are also designed for those with physical limitations like arthritis or a disability of some sort. Most of my apron ties will wrap around and tie in the front of most body types. So, if you've got arthritis, you don't need to strain yourself trying to tie the apron in the back when you can much more easily tie it in the front. This also works great for wheelchair users who find knots in the middle of their back as uncomfortable as I do. The straps are wider than the standard apron straps to make it easier to grip with arthritic or wet hands. The neck straps are also wider so that they don't cut into your neck with extended periods of wear and it's also easier to get over a freshly done head of hair, or not tangle in really long hair."

I like her philosophy on things being useful and practical. I know it is something I try for in my store. I don't have anything of purely decorative function. I don't consider toys purely decorative, since play is important for children, and sometimes for adults. :) Click on the apron to visit her shop and see the other aprons available.

Tuesday, October 23, 2007

Free Apron Patterns!

I looked up some free apron patterns online for everyone's edification. Some are plain, some are less so, and a couple are vintage!

Quilt Block Apron (girls): http://www.allfreecrafts.com/sewing/quilt-block-apron.shtml

Plain Historical Apron : http://www.1771.org/cd_apron.htm

One Yard Apron: http://sewing.about.com/od/aprons/ss/oneyardapron.htm

Apron Bonnet Pattern (vintage) : http://tipnut.com/vintage-apron-bonnet-pattern/

Make your own vintage style apron pattern: http://www.girlistic.com/diy/apron.htm

Ten Vintage Apron Patterns (must be printed in miniature and transferred by hand onto grid paper. It would be a pain, but they are pretty cool.): http://www.dorothyshomegoods.com/articles.php?tPath=12

Oh, and a bonus oven mitt pattern: http://www.allfreecrafts.com/sewing/oven-mitts.shtml

Also I found this excerpt from a vintage sewing lesson book on aprons:

" Did you ever stop to consider how many different kinds of aprons there were? A great, big, roomy, coverall apron for mother when guests are expected and important things are happening in the kitchen. A wee bit of a lace apron for the person who is in charge of the tea-urn at five o'clock. A smart bungalow apron to make household duties seem pleasant, and a rather petty apron with deep pockets for the sewing room. And, of course, sweet little aprons for the kiddies—gaily colored and bound with an almost grown-up regard for smartness."

Apron Week!

I've decided to make this week Apron Week on my blog. I actually was going to start yesterday, but had kind of a blah day and didn't get it done.

I'm going to start with my personal apron collection. I like vintage aprons, but don't really have that many. Part of it is that having three (and one more waiting to be made) I don't feel I have a really good excuse to buy any more. I don't need a lot of things cluttering up my house, even actually useful things.
This green one is my baking apron. It is not actual vintage, but was a sort of experiment I did, to see if the front half of a vintage dress pattern would make a good apron. Answer: well, it's got plenty of coverage (thus the reason I use it for baking) but there is a reason most aprons don't have bust darts. The back of the dress being gone throws things off kilter, and the bust darts slip down and look odd.

This apron is not an actual vintage apron either, although the swirly green and blue fabric is vintage that I got at a garage sale years ago, and the pattern is traced off of an apron that my great-grandmother made. This is my "hostess apron". I use it when I'm having people over and am going to be cooking. That way I've got somewhere to wipe my hands, but it looks cuter than the other aprons.

This apron is actual vintage, and is probably my favorite. It's my "everyday" apron. I've gotten in the habit of cooking in an apron now, and if I forget to put one on, I tend wipe my hands on my clothing, out of habit. The design is cross-stitched onto the gingham. I keep thinking I'm going to trace this off and make a similar apron, but haven't got around to it.

I hadn't worn an apron to cook in since I was a kid, until about a year and a half ago, when I was having a birthday dinner party for myself. I was cooking, wearing an old tee-shirt to keep from splattering my good clothes, and planned to go change before the guests arrived. Well, the guests arrived early and I never got downstairs to change. I wore the grungy tee-shirt, and it wasn't a big deal, but I was the least dressed up at my own party. I thought, if I'd only had an apron (but I've never liked the ugly canvas barbecue aprons), then I stumbled across some vintage apron websites and an obsession was born.

Monday, October 22, 2007

Finishing Touches


I did in fact get the lining hemmed on my new dress. Here is a pic showing the lining hem and the one extra little "couture" thing I did on this dress. On the flounce, the directions merely called for sewing the flounce halves together the normal way and pressing the seam out flat. Having made a similar skirt and been driven to distraction by the seam allowances raveling and leaving little strings hanging down my legs all the time, I finished sewed the flounce halves together with a french seam instead. Much neater, no fravely edges to catch on things and hang down.

For comparison, here's a pic of the other skirt flounce. It is polyester charmeuse, which is horrible about raveling anyway, so much so that if I sew with it again, I'm going to do the whole garment in french seams.

Saturday, October 20, 2007

Close Enough for Government Work


Okay, so the dress is technically not finished. But it is finished enough to take a picture of. I still have to turn the lining under and tack it down around the bottom, but that is it. Before I do that, however, I want to get out my Vogue sewing book and look it up to decide how to do it.

I finished the dreaded zipper and hem. I set the iron down on the middle joint of my pinkie while ironing the hem out, yay! The zipper didn't turn out perfectly, but it turned out better than some past zippers I have done. I just haven't perfected the technique, though I do a lot better on short zippers, like for skirts. The instructions that are in the pattern are better than the ones that are packaged with the zipper (except one vintage zipper I used had really good instructions, but of course I lost them). I looked at the instructions in the Vogue book, too, but didn't use them because the ones with the pattern seem better.

One nice thing about black is that stitching mistakes in black thread don't show up. That's also the bad thing, that it's hard to see the stitching, and makes it a pain to rip stitches out. That's one reason I didn't go for solid black for this dress.

I sewed on one of the new labels I got for my Etsy stuff. Isn't it cute? I was very pleased with how they turned out.

Thursday, October 18, 2007

It's Getting There!


The jumper is coming along nicely. I finally was able to sew up the side seams and it looks like a dress! I tried it on with various shirts underneath, and I think it will look even cuter than I had thought, which is always nice. I still have to insert the zipper and attach the flounce and hem it (Inserting long dress zippers is not my idea of fun, and often procrastinating on it will add weeks to the completion time of a dress, but I want to get this dress ready to wear when Brandon and I take a few days away to celebrate our 6 month anniversary, which was this Monday, so the "deadline" will hopefully help me to just push through and do it.) I also hate hemming, but the flounce is hemmed with a narrow hem, and it isn't a terribly long hem, so it won't be that bad.

I think I like the structure that the lining gives the dress, but I hate putting it in. The lining material is all staticy and ravels something awful, so little strings are sticking to everything and catching my scissors, but soon all those little ravely edges will be enclosed and I won't have to worry about them. Happy thoughts. :)

Wednesday, October 17, 2007

Department of Product Testing and Development


I like to play around with making new things. That's probably why my shop has such a wide range of things, and not as much focus as I'd like. Anyway, my latest little obsession came to me yesterday. I was thinking of making little drawstring bags (to use as holiday wrapping) and I took out my big bag o' ribbons, to see if I had any suitable for using as drawstring. Then I had the idea of making little envelopes out of some really wide pink ribbon. I thought "They'll make great jewelry pouches!" and I decided to whip up a group of 5 and list it on Etsy. Well, the little tiny snaps have to be hand-sewn, which when I charge for my time, makes the final cost of each (including shipping) $2. I posted a thread in the forums asking about it, and the general consensus seems to be that that is too expensive. So I laid awake last night thinking about it (that's what I do, lay awake thinking about ways to make new things. I come up with some good stuff that way. Well, and rehashing every embarrassing incident since second grade and coming up with witty rejoinders, but who doesn't?)

This is what I came up with: little felt bags. No fraying = less sewing, no snaps = less sewing, less sewing = lower price. They aren't as cute, IMHO, but they cost almost half as much.

The littlest one I can sell 5 for $4.25, plus $1 shipping (to the US), making the final cost of each $1.05. The biggest one I can sell 5 for $4.60, plus $1 shipping, making the final cost of each $1.12. For larger quantities the price is slightly lower. I don't know if they are too expensive still for most Etsy sellers, but it's a big drop.

I want opinions on my newest creations, so I'm having a drawing. The winner will get one small gray jewelry envelope (or I have pink felt, if you prefer). Leave me a comment here or on this thread on the message board, giving your opinion, suggestion, or why you would or wouldn't buy these, and I'll enter you in the drawing, which will take place tomorrow at noon (Oct. 18). Make sure that if you're on Etsy, you give your seller name in the comments, so that I can contact you if you win. If you're not on Etsy, make sure there is still some way I can contact you through your comment.

Thank you!

Tuesday, October 16, 2007

Still in Progress...


One of my favorite parts about sewing clothing is that moment when you have sewn all the major seams and what you've been working on goes from a pile of unrecognizable fabric pieces into something that resembles the finished product, and you can start to see how it is going to look on you.

Unfortunately, I'm not there yet on this jumper. It looks all nice and neat laid out, but none of the side seams are sewn (due to some strange way they want you to construct the lining. I'm sure it will all work out, but I want it to look like a dress. And now!) so it's all loose and flappy and just a mess. I spent quite a while working on it yesterday (although a portion of that was spent ripping seams and cutting 2" off the hem, which I should just do before I even start, since I am a good bit shorter than any of the models that they use for these things) and was quite disappointed that all that work still didn't get me something I could try on. If I'd left out the lining, as I originally intended, I'd be a good bit closer to finished. But I'm sure once it's all over with, I'll appreciate the lining and be glad I took the time.

Some people sew for the process. I sew for the finished product, although the process can be enjoyable at times. Generally, though, the process is just something that gets in my way.

Monday, October 15, 2007

Advanced Mud Pies


Here I am, stylin' in my cowboy boots and baseball cap. This weekend my husband and I went home to Texline to help my parents stucco the house. My sister and her husband went as well, and even my brother made a brief appearance. See, years ago (probably four or five years ago) when I was away at college or something, they started to stucco the house, got the first coat of cement on. Then my dad got busy with other things and the house has been sitting there partially finished ever since.

Everything we've done on that house went slowly, since it's a weekend/vacation project. When I was in junior high we started work on it, dug the basement and moved an old house in, then knocked all the interior walls out and re-did the inside. We built a porch all the way around. By the time I was a senior in high school, we finally moved into it. When I was in school, I hated to work on that house. I've hung sheetrock and mudded the interior walls, helped with roofing and laying shingles, and painted more than I care to think about at the moment, along with whatever other odd jobs were going on.

Anyway, us kids figured it was about time to finish the outside, already. Even if no one outside the family sees it much (my parents live out in the country) it would just be nice to have it done. So we all set a date and got together, and it was hard work, ya'll. Of course, if any of us had had much experience stuccoing it would have helped. My sister Sam's husband Jonathan had done some in high school, because his dad and grandad did a lot of stuccoing, but he couldn't remember much about it. We did have a couple of phone consultations with his dad on how to do it all right.

In the end we didn't finish the house. Two days is kind of pushing it, especially considering that things were done in the traditional Crum way, you know, inadequate preparation and several last minute trips to the hardware store. Then we got rained out Sunday afternoon. We were down to the last wall, but I guess it will have to wait.

Stuccoing basically involves lots of splatting cement up on the wall and smoothing it out. Brandon said "You know, if I were two years old, I really would have enjoyed this." The cement really dries your hands out. Even though I wore gloves, my hands are peeling a little. My biceps are hurting. And my back. But not as badly as I expected, actually. Yesterday I was predicting that I would barely be able to get out of bed, and would hobble around like a little old lady all day.

Friday, October 12, 2007

Etsy Shop Feature: Nutmegs

Nutmegs is a new shop on Etsy, but has a very cohesive, elegant feel to it. I really like her Autumn Walk Cable Clutches, so I asked Megan about them first.

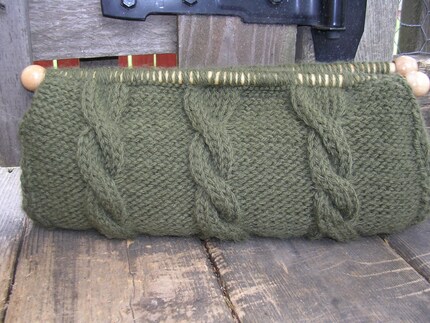
"My Autumn Walk Cable Clutches are new designs of an item that I created for myself during my first Fall season in New York - it marked the months when I first fell in love with the city for all its sights, sounds and aromas.
The clutches are each original designs, and have not been duplicated. This type of design requires some math and geometry (yikes!), pattern-making, a lot of sewing, some basic woodworking and staining, and of course quite a bit of complicated knitting. The unique shape and style of the clutch is created by making several fabric and knit pieces which are later worked together with knitting, crocheting and sewing. The cable designs are worked on each side of the clutch; a relatively thin yarn and small knitting needles are used in order to create a tightly woven knitted fabric - this means lots of stitches! These clutches require the most adept skill of all Nutmegs Fall 2007 items, and are certainly the most time consuming - clocking in at an estimated 20 hours! They are intended, however, to present as simple yet elegant, unique and striking. My personal favorite aspect of the clutches are the contrast between the earthy knitted outer pieces and the elaborately patterned fabric linings."

I think everyone has a unique story about how and why they started knitting. This is hers:

"I grew up and attended high school in Chicago. As suggested by jokes and rumors, winters in Chicago are quite cold! When I was a sophomore in high school, the heat in my school building was inexplicably shut down for a short period of time. During this time, due to the silly no-coats-in-the-building policy, scarves instantly became an indoor wardrobe staple. It made me look at scarves in a whole new light, and I began scouring the city for unique pieces with a lot of personality. I was never able to find a scarf that I really loved, and immediately decided that I needed to learn to knit. I found all of the interesting independent yarn shops in the neighborhood and taught myself how to create the perfect scarf from the pages of an assortment of library books. And that was the beginning..."

What kinds of art/craft do you do?

The Fall 2007 collection currently in my shop features an eclectic assortment of knitting, embroidery, sewing, crochet, jewelry, and handmade paper. ...I’m excited to offer an ever-changing selection, full of surprises, which always represents my process, and contains lots of heart because it evolves alongside my own passions.
I’ve created art for most of my life, and obtained a minor in studio art... Some of my other favorite media are ceramics and sculptural arts, mixed media collage, and various types of fiber art. I am currently teaching myself to spin yarn and make small rugs from my painted designs!

Which is your favorite?

My current fascination is all sorts of fun fabric creations. That said, as various forms of inspiration come and go, I tend to cling to new favorites every few months, and this new fabric kick is immediately following a year-long yarn and fiber obsession. I seem to be doing at least a little bit of everything at all times!

What things are important to you as you are making an item?

Many of my ideas come from my own quests for unique, beautiful, and high quality items, and all of these features are extremely important to me. I strive to create items that, though typically made from common materials, stand out as having entirely unique design or function. ...Each item I create embodies the vision and style that defines me as a person and as a designer. My ultimate wish for Nutmegs products is that, while eclectic, all of my items will contain this common stylistic element that ties them all together. I’d be thrilled if one day I heard someone say “Hey, that looks like a Nutmegs design!”

What are your influences or inspirations?

New York City is an amazing place to create any type of art because of the incredible diverse masses of people and places. Much of my inspiration comes from color that surrounds me - I am endlessly attracted to earth tones and particularly the rich tones found in nature and during cool Autumn months. I also find inspiration in my favorite environments...cobble stone streets on rainy days, rows of brownstones with lampposts and front stoops, crowded coffee shops with people playing scrabble, momentarily serene blocks in the middle of such a busy city...this type of imagery sticks to me, swims around in my head, and eventually comes trickling out into the little somethings that I create.

How has your life experience influenced your work?

Recently, my professional mission has been the most powerful influence on my Nutmegs products. Within the mental health field, I consistently advocate for and provide creative therapeutic interventions. I passionately believe that creative expression is essential for self-care and paramount in individuals’ process toward self-fulfillment. I have worked with art therapy quite a bit... Furthermore, my work allows me to be exposed to the most inspirational and unique parts of people’s selves, which provides me with an infinite supply of creative fuel. The work I do as Nutmegs is my refuge and my happiest mode for self-fulfillment.

How did you discover Etsy?

I discovered Etsy when I began planning my move from Manhattan to Brooklyn after finishing graduate school. Thoroughly excited about living in my new neighborhood, I began researching local art shows and craft fairs that I could pursue. Somewhere in the middle of this search, I stumbled upon Etsy and was completely inspired by what I saw. After years of contemplating starting a website, but never feeling completely up to the task, I was instantly taken in by the opportunity to become part of this incredible community of artists. I’m so excited to be at the beginning of what I hope will be a long-standing involvement in the Etsy community.