Word of the Day!

Word of the Day

Monday, January 28, 2008

A New Apron For My Collection


I was at Goodwill the day before yesterday, searching idly through the racks, as is my habit (I just can't pass that store. One just opened up in Clovis next to the Hobby Lobby, which makes that particular shopping center a Bermuda Triangle into which I regularly disappear.), and I found this nifty apron. For $1.29.

I like the petal shaped sections. It looks really cute on. And it has little green deer on it. What more could you ask? (Sometimes I wonder about the people who came up with all those wacky vintage prints. Exactly what possesses one to make purple Indians and green deer? Unless these are supposed to be the natives of Mars.)

Friday, January 25, 2008

In which I make a muslin of my "wearable muslin"


So I bought some cotton duck and some cotton lining fabric at Wally World, and was all geared up to start my "wearable muslin" for the Kwik Sew jean jacket. In a stroke of luck (the kind that sometimes happens when one uses vintage patterns) the person who had the pattern before I did had traced the pattern onto tissue paper in my size. And she had lengthened the pattern, too, which saved me a lot of trouble. (This sort of luck is equally balanced by the chance that you will find instead that the vintage pattern is missing pieces, or instructions, or has pieces from other patterns mixed in.) I cut all the pieces out of the duck, and started sewing that night.

Immediately something that had nagged at me while I was cutting the pattern pieces out made itself clear: the pattern has some bust shaping that doesn't really show in the illustrations on the envelope. Not only that, but the shaping is for someone who is not shaped quite the way I am. I had to do a small-bust adjustment (SBA) on the pattern. I was quite proud of it, since I worked it out with only vague recollections of having read how to do an SBA once. I tend to be that way when I'm in the middle of something. I hate to have to go and look up instructions, so I just wing it.

I had to stop there and make another muslin (unwearable), to make sure that the SBA was going to work right. That's what the hideous flowered thing in the pic is. I also had to buy an extra 3/8 yard of black duck at Wal-Mart since the cutting layout was so tight I didn't have extra fabric for the new pieces.

The really bad new is, I don't think this pattern is going to work for the corduroy and minky that I had planned for it. It is very tight fitting, too close to the body to allow for the thick lining. So after I finish the wearable muslin (which should be quite cute, in black with red topstitching, lined with a cherry print fabric), it's back to the drawing board for me in terms of finding a jacket pattern for the yardage I bought.

Friday, January 18, 2008

Patternless Fleece Hat Tutorial


Yesterday I went through several projects-worth of fleece scraps and used what I could to make winter hats. Through trial and error, I developed a nearly fool-proof way to make fleece hats using the head measurements of the person the hat is intended for. The hat is made from one rectangle of fleece. It is fairly simple, and so it is quite possible that I am not the only person who has discovered this style of hat. It would make a good gift, and can be very inexpensive depending on the fabric used. It would be a good donation to charities such as homeless shelters in the wintertime. The double layer of cloth over the ears makes it warmer and more wind-proof.

I estimate that one yard of inexpensive fleece ($3 to $10 at a discount store, or you could buy fleece blankets in good condition from a thrift store) would make up to 6 adult hats, and more than that if you were making hats for children. Once the basic style is mastered, it lends itself easily to variations such as color blocking and stripes.

If you are not confident marking the measurements directly onto your fleece and cutting, you can draw them onto newspaper and pin that paper pattern to your fabric, just as you would use a store-bought pattern.

Materials Needed: measuring tape, ruler, chalk, adequate amount of fleece for the project (a rectangle approx. 12" by 22" should be enough for most sizes), scissors, sewing machine, thread, and a hand sewing needle

Step 1: Measure around your head, or the head of the intended recipient of the hat. If you do not know their head measurement, I have found that a small adult's head is around 21 inches, and a large adult's head is around 23 inches. This measurement will henceforth be referred to as H.

Step 2: Subtract 1 from H and add 1/2 (H - 1 + 1/2). We will call this measurement W. This is the width of the fabric piece for the hat.

Step 3: Using chalk, mark out a rectangle on your fleece fabric, with a height of 12" (children's hats should have a height of 10", or the approximate distance from the center of the top of the head to the bottom of the ear, plus 2.75") and a width of W. Please ensure that W is laid across the stretchiest grain, whether crosswise or lengthwise, so that the most stretch goes around the head.

Step 4: Fold the rectangle in half right sides together. This should give you a rectangle measuring 12" by 1/2W". Using a 1/4" seam, sew along the open 12" side and one of the 1/2W sides with a straight stitch, leaving one side open. This is the head opening of the hat, the bottom hem.

Step 5: Fold up 2 and 3/4 inches along the bottom hem. Sew using a zig-zag or three-step zig-zag stitch.

Step 6: Turn the hat right side out. Now you have what is essentially a square hat. If nothing is done to shape it to the head, it will stick up like cat ears. Quit here if you like that look.

Step 7: Head shaping: Take each of the top corners and bring them together in the middle. Sew the corners together by hand with needle and thread.

Tuesday, January 15, 2008

The Long-Awaited Fabric


If by long awaited you mean approximately one week. I'm very excited that it arrived, BUT as soon as I got it I realized that with such expensive fabric, and the design changes I am planning (lining it when the pattern is unlined, and changing the front facings) I should probably make a muslin out of some cheap fabric first.

So I will probably do a cheaper version first, but I hate to. Because my wearable muslin will be lined in cotton for a spring-weight jacket, and the good fabric will be for a heavier jacket, and it's cold NOW. It won't be warm enough for a thin jacket for a few months. I'll be doing it all backwards!

Thursday, January 10, 2008

"My nose can go higher than yours."


"No, mine can."

"No, mine."

"No, MINE!"

At that point, it devolves from a "Nose in the Air" Contest to a screaming catfight.

This is a lovely pattern envelope. Unfortunately, one of the MAJOR pattern pieces is missing (the whole front of the dress).

Look what I have!


Last night Brandon and I had to go to Hereford to take my brother his pickup, which he'd left at our house while he drove the red Mack truck that Brandon had been driving. He brought this puppy with him. She is from a litter of pups one of my dad's friends was giving away. My dad called up a few weeks ago and asked if I'd be interested in one, and we worked out the final details of transporting her a day or two ago.

I love cowdog mutts. Hopefully when she gets a little older, I'll be able to train her to work the goats. You can tell she's got a lot of border collie, as well as blue heeler (also known as Australian cattle dog), and a sprinkling of mystery dog. I estimate she's somewhere around two to three months old, but I'm not real good at guessing those things.

Right now she's still pretty timid and freaked out by her new environment, which is probably in part due to the fact that as soon as we got in last night, literally as soon as I set her down on the ground, Spud, our big yellow tomcat, came flying out of the darkness and attacked her. She spent the night in the garden shed, and now that is safe territory, as is the kitchen, but she always looks ready to take cover from sneak attacks. She has a really good disposition, though, and is friendly.

We decided to name her Beulah, after the lady dog in the Hank the Cowdog books.

Tuesday, January 8, 2008

UFO! Now an FO!


I went online and spent about $25 last night for material for a jacket I want to make. Making all those shirt jackets for Christmas made me want something similar for myself. While I wait for the fabric to arrive (and it is hard to wait!) I am going to work on some UFO's I have sitting around. UFO, for those that don't yet know, stands for Unfinished Object.

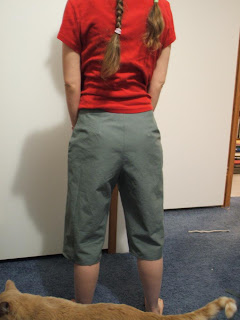
Today I finished this pair of capri pants, which I've had lying around, cut out, for around five years now. As best I remember, I bought the material around the time I graduated college, although it may have been before that, even. Then I cut out the pieces, and didn't start sewing because I wanted to add cargo pockets, and was trying to figure out how best to go about that. Somehow I never got around to figuring it out, and then I went into the Peace Corps.

When I came back from the Peace Corps, bermuda shorts were in, so I cut the capri pants down to a sort of bermuda length. Then they sat around some more, and moved from my parents house to Farwell when I got married.

They didn't take long to finish, although I found that either I have lost some weight since the day I chose what size to cut out, or when I cut the pattern out, I measured my size wrong (which happened another time, so I'm betting that was the problem). At any rate, I sewed the side seams, tried the pants on, and they were just falling off of me. So I sewed a new seam exactly 5/8" away from those stitches, taking out around 2" of circumference, and cut the old seam allowances off, and they are still a little baggy. Comfortable, but they don't fit like they were intended to by the pattern makers.

I imagine I'll wear these around the place when the weather gets warm, but don't foresee a lot of public exposure in their future. I really wish I still had the excess yardage on this. These shorts really need pockets.

The Gory Details

Finally, as promised, the gory details of the changes I made from the Kwik Sew2728 pattern for Brandon's jacket. One small change that doesn't really bear detailing is that I used the curved shirt hem instead of the straight one, which is shown on the hooded view on the envelope. Just a minor change because I like the look of the curved hem. Also, I lengthened the sleeves about two inches, which I like to refer to as "monkey arm alteration"

1. Adding in-seam pockets. This was probably the largest change that I made. It was surprisingly easy. In-seam pockets, it turns out, are pretty much the same shape and size for anything. I borrowed the pattern piece from a vintage robe pattern I had. I measured how far up the from the shirt hem the pocket was on one of Brandon's store-bought lined shirts to determine placement. (For those who are curious, it was 3.75" up, but remember, I used the curved hem, so it would be different on the straight hem.) I followed the instructions for in-seam pockets from my Vogue Sewing book, plus I top stitched the pocket pieces to the seam allowances where the pocket pieces connected with the shirt-side pieces, to make the pockets lie flatter.

2. The shirt has a yoke in the back. To reduce bulk (the lining is a fleece that is already bulky enough), I traced a separate lining piece of the yoke and back piece together, minus the seam allowance between the two. So the back of the shirt that the world sees was done with the yoke, but the lining is a single piece. If you are looking to save time, it takes longer to trace the pieces than it does to sew the lining yoke to back piece, but for reducing bulk it works well.

3. I made a casing for a drawstring on the hood. I felt this was a necessary change so that the hood would be warmer and stay on his head better. I decided arbitrarily to put the buttonholes for the drawstring 3" up from the bottom of the flannel hood pieces, and a quarter-inch from the side. The buttonholes had to be made before the flannel and lining were sewn together. Two inches was too far up. It would have been better at around .75" or so. I wish I'd gotten some metal eyelets for the drawstring to run through, as I'm not sure the buttonholes will hold up. I used a black boot lace for the drawstring itself, which works well enough.

Instead of topstitching a quarter inch from the edge of the finished hood as suggested in the instructions, I top stitched a half inch away, to leave plenty of room for the drawstring. That distance worked very well.

4. The other minor change I made was to add a slot in the top of one of the chest pockets for a pen to slip through. This is a useful detail found on many store-bought shirts, but neither of the men's shirt patterns I've made have included it. Luckily, it's not hard. I won't explain it here, because if you want to do it, and are of sufficient skill to be sewing a man's shirt, you probably have sufficient skill to figure it out by looking at an existing shirt, or even my picture.